

As a developer, you must have come across a situation where an application you worked on runs seamlessly on your machine but when you pass it on to someone else, for some reason it doesn’t quite work on their machine?
Well, the "it works on my machine" phrase doesn't help much in such cases. This issue is easily solved using a technology known as Containerization.
What is Containerization?
Containerization is a technology that allows the software to be packaged together with all of its dependencies, such as libraries and system tools, in a single container. This container can then be run on any compatible host machine, regardless of the underlying operating system or system configuration.
Now Containerization is a technology that’s been around for a long time, but it’s seen new life with Docker. Let's try to understand what docker is and why do we need it?
What is Docker?
Docker is a platform and tool for building, shipping, and running distributed applications using containerization technology. It provides a CLI and a platform for building, shipping, and running containerized applications. With Docker, developers can package their applications and dependencies in a container, which can then be run consistently across different environments, such as development, testing, and production. This makes it easy to develop and test software on a local machine and then deploy it to a live environment, without the need to worry about differences in system configurations or dependencies.
Why do we need Docker?
Docker provides several benefits that make it useful for developing, deploying, and running software applications. Some of the main reasons for using Docker include:
Isolation and consistency: By packaging an application and its dependencies in a container, Docker ensures that the application will run consistently across different environments, regardless of the underlying system configurations. This makes it easy to develop and test software on a local machine and then deploy it to a live environment without worrying about compatibility issues.
Efficiency and portability: Containers are lightweight and take up fewer resources compared to VMs. This makes it possible to run more containers on a single host, increasing the density and efficiency of the infrastructure. Additionally, Docker containers are portable and can be run on any system that supports Docker, making it easy to migrate applications between different environments.
Scalability and orchestration: Docker makes it easy to scale applications by adding more containers, and it also provides orchestration tools like Docker Compose and Docker Swarm that allow you to manage and coordinate multiple containers.
Ease of use: The Docker CLI is simple and easy to use, making it accessible to developers of all skill levels. Additionally, Docker Hub, the public registry for containerized applications, allows developers to easily share their work with others and leverage existing images from the community.
In summary, Docker is a powerful tool that allows developers to build, ship and run applications in a consistent and efficient way, providing isolation and consistency, portability, scalability and orchestration, and ease of use.
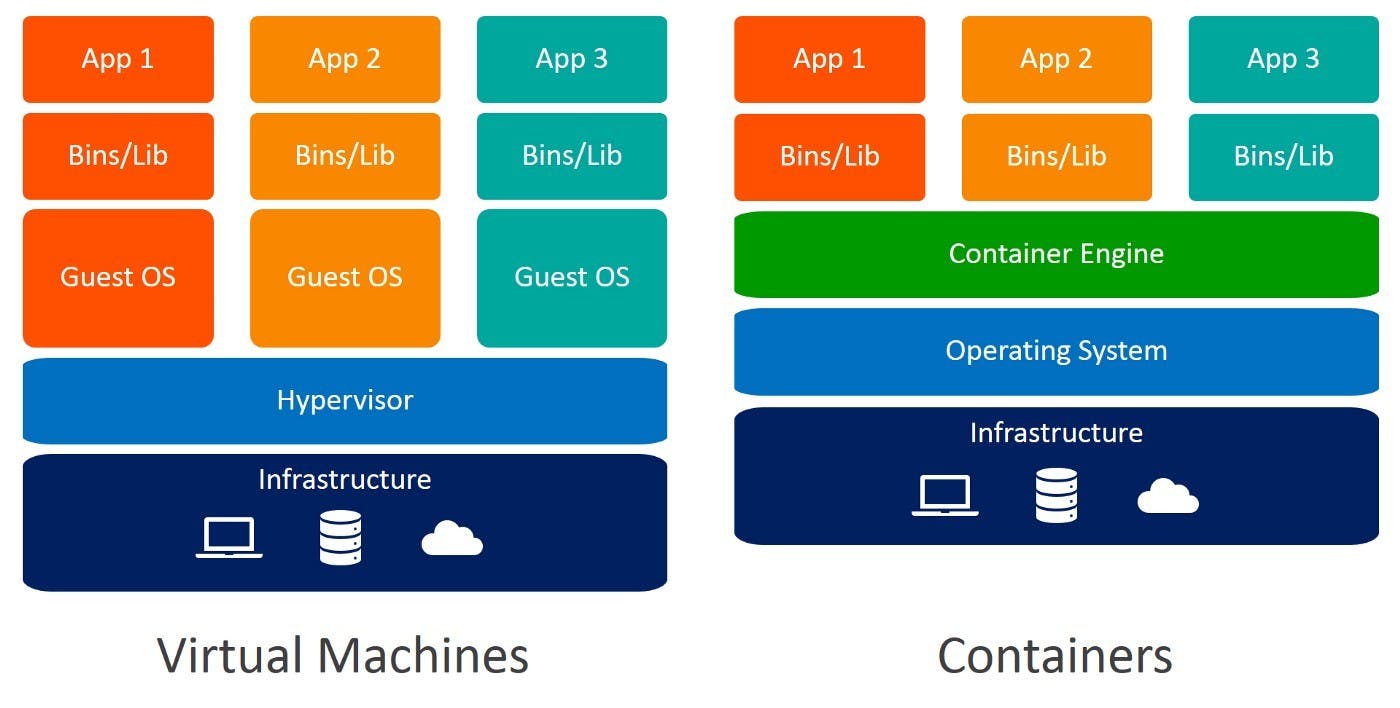
Containerization vs Virtualization
Virtualization creates a virtual version of a physical device and runs its own operating system. An application on a VM requires a guest OS and thus an underlying hypervisor to run. Hypervisor is used to create multiple machines on a host operating system and it manages virtual machines, while Containerization shares the host operating system and isolates the environment using namespaces and cgroups. Containers are lightweight, efficient, and fast to start, but less isolated than VMs. In comparison, VMs are more isolated but require more resources and take longer to start and thus are considered less efficient wrt Containerization. Essentially, containerization can be considered as lightweight approach to virtualization.
Docker Architecture

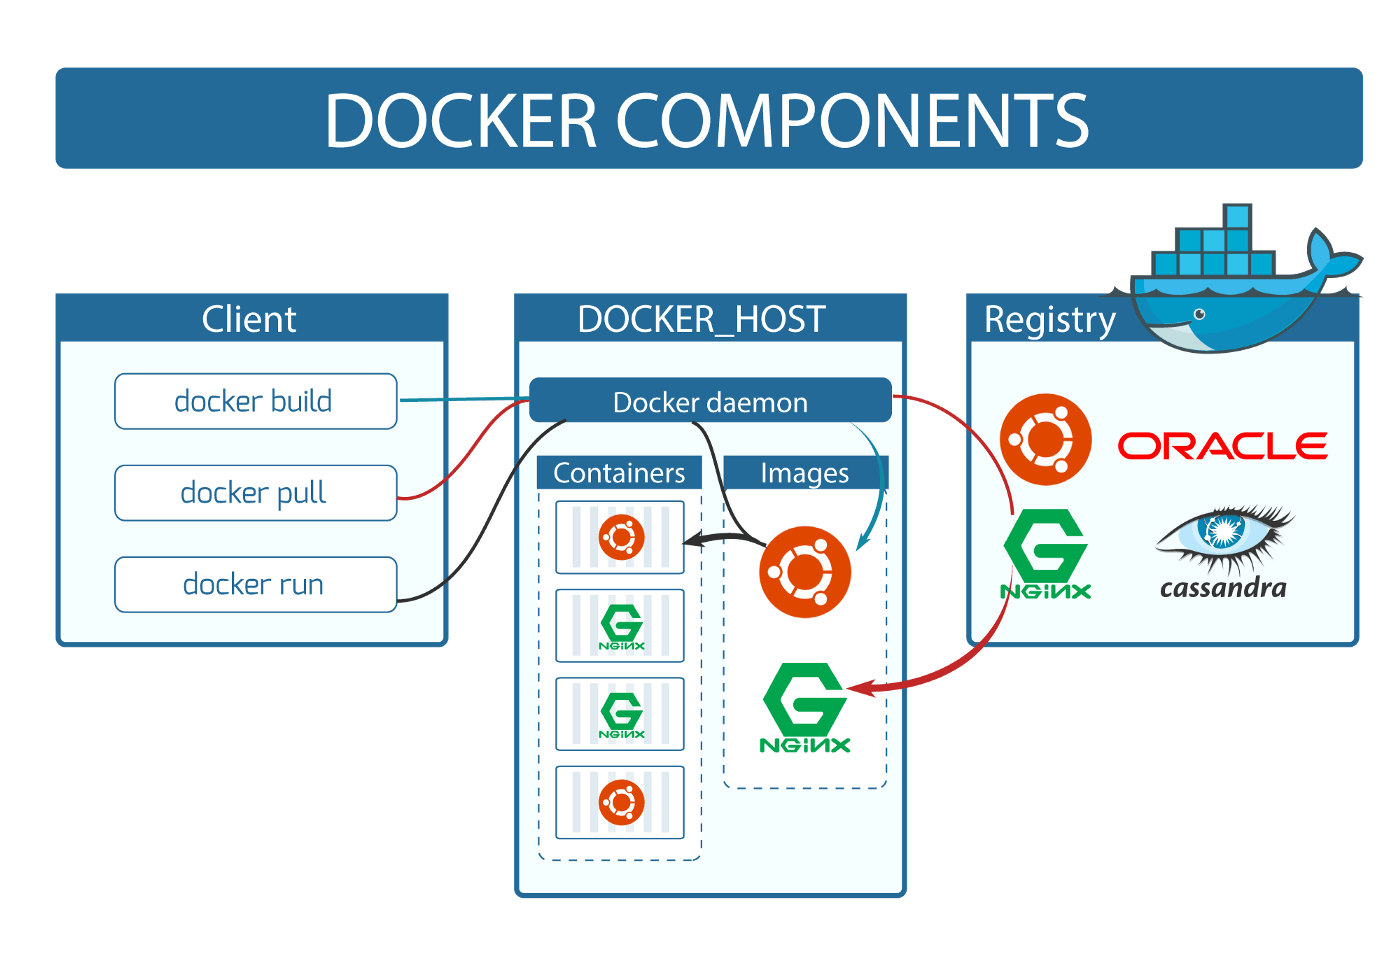
Docker follows a client-server architecture. Here we majorly have two components i.e the Docker client and Docker daemon. The docker client communicates with the docker daemon which then sustains the workload of building, running, and distributing your Docker containers.
For download and installation refer: docs.docker.com
Docker daemon
The Docker daemon is a background process that runs on the host machine and is responsible for creating and managing containers. It is the core component of the Docker Engine, and it communicates with the Docker client to handle requests to create, start, stop, and manage containers.
The Docker daemon is responsible for several tasks such as:
Creating and managing container objects, including their storage, networking, and execution environments
Managing the container lifecycle, including starting, stopping, and deleting containers
Managing the communication between containers and the host system
Managing and maintaining the images that are used to create containers
Managing and maintaining the Docker registry where images are stored
Responding to requests from the Docker client and other components of the Docker Engine
The Docker daemon runs as a system service on the host machine and communicates with the Docker client using a REST API over a UNIX socket or a network interface. This allows developers to interact with the Docker daemon using the Docker command-line interface (CLI) or programmatically using the Docker API.
It's important to note that the Docker daemon runs with root privileges, and it is recommended to be run in a secure environment, and access to the daemon should be restricted to trusted users only.
Docker client
The Docker client is a command-line interface (CLI) tool that allows developers to interact with the Docker daemon. It is responsible for sending commands to the Docker daemon, which in turn creates and manages containers. When you run a command using docker, the client sends the command to the daemon, which carries them out. The Docker client can communicate with more than one daemon.
Docker Registry
A Docker Registry is a place to store and distribute Docker images. The Docker Hub is the default public registry for Docker images, but it's possible to use other registries such as a private registry within an organization. Some of the other famous registries are: GCR (Google Cloud Container Registry), ECR (Elastic Container Registry) etc
Dockerfile
A Dockerfile is a script that describes how to build a Docker image. It is a simple text file that contains a set of instructions, each one specifying a command to be executed on the command line, and the files and directories that should be added to the image. Once the Dockerfile is created, it can be used to build the image using the docker build command.
A typical Dockerfile contains the following instructions:
FROM: specifies the base image to use as the starting point for the buildRUN: runs a command in the container to build the imageCOPY: copies files and directories from the host machine to the containerENV: sets environment variables in the containerEXPOSE: specifies the ports that the container will listen on when it runsCMD: specifies the command to run when the container starts
Here is an example of a simple Dockerfile that creates an image for a web server:
FROM alpine:latest

RUN apk update && apk add nginx
COPY index.html /usr/share/nginx/html/
CMD ["nginx", "-g", "daemon off;"]
EXPOSE 80
Docker Images
Docker images are the fundamental blocks of the Docker platform. They are pre-configured snapshots of a containerized application and its dependencies. Images can be created using a Dockerfile, which is a script that describes how to build the image. Once an image is created, it can be stored in a Docker registry, such as the Docker Hub, and used to create new containers.
Basic Commands
$ docker pull ubuntu:18.04 (18.04 is tag/version (explained below))
$ docker images (Lists Docker Images)
$ docker run image (creates a container out of an image)
$ docker rmi image (deletes a Docker Image if no container is using it)
$ docker rmi $(docker images -q) (deletes all Docker images)
Images are built-in layers. Each layer is an immutable file but is a collection of files and directories. The last layer can be used to write out data. Layers receive an ID, calculated via an SHA 256 hash of the layer contents. This hash value is based on the contents of the image, including the file system layers, metadata, and configuration. You can use the docker images command to view the list of locally available images and their associated hash values.
For example, to list the images and their hash values, you can run the following command:
docker images --digests
This will display a list of all the locally available images and their associated hash values, along with other details such as the repository, tag, and size. The output will look like this:
REPOSITORY          TAG                 DIGEST                                                                                                   IMAGE ID            CREATED             SIZE
my-image            latest              sha256:7f48a4a4e4a4f48a4a4e4a4f48a4a4e4a4f48a4a4e4a4f48a4a4e4a4f48a4a4e4a4f48a4a4e4a4  7f48a4a4e4a4        5 minutes ago       1.41GB
Note: The Image ID listed by docker commands (ie ‘docker images’) is the first 12 characters of the hash. These hash values are referred to by ‘tag’ names.
Containers

A Docker container is a running instance of a Docker image. Each container is isolated from the host system and from other containers, and it includes everything needed to run the application, including the application code, libraries, system tools, and runtime environment. If we delete a container the data will be lost! Because when the container went down and we brought it back up, the last layer got created again as a new layer. This helps in development if you don’t want to store records for each test. To be persistent, use volumes to store data.
Docker Network
The Docker Network is used to connect containers to each other and to the host system. It provides a way to configure the network settings of a container, such as IP addresses, port mappings, and DNS settings.
Docker Volumes
A Docker Volume is a way to store data outside of a container's filesystem. It allows containers to access data on the host system or on external storage systems, such as a network file system. This allows data to persist even if the container is deleted or recreated.
There are two types of volumes in Docker:
Bind mount: A bind mount is a way to mount a file or directory from the host machine into a container. This allows the container to access data on the host system, and it also allows the data to persist even if the container is deleted or recreated.
Named volume: A named volume is a volume that is created and managed by Docker. It is a way to create a volume that is separate from the host machine, and it can be accessed and modified by one or more containers. Named volumes are stored in the host machine's file system, and they are created and managed using the
docker volumecommands.
You can use the docker run command to create a new container and mount a volume. For example, the following command will start a new container and mount the host's /data directory to the container's /app/data directory:
docker run -v /data:/app/data -it --name mycontainer myimage
Alternatively, you can use the docker volume create command to create a named volume and then use the docker run command to mount it to the container. For example, the following command will create a new volume named myvol and then mount it to the /app/data directory of the container:
docker volume create myvol
docker run -v myvol:/app/data -it --name mycontainer myimage
It's important to note that the data in a volume is stored outside of the container and it's not part of the image, this allows you to update or replace the container without losing data, and also allows you to share data between multiple containers.
Recap With Demo
- Pulling an image from the Docker registry:
$ docker images
REPOSITORY      TAG      IMAGE ID     CREATED      SIZE
$ docker pull ubuntu:18.04
18.04: Pulling from library/ubuntu
7413c47ba209: Pull complete
0fe7e7cbb2e8: Pull complete
1d425c982345: Pull complete
344da5c95cec: Pull complete
Digest:sha256:c303f19cfe9ee92badbbbd7567bc1ca47789f79303ddcef56f77687d4744cd7a
Status: Downloaded newer image for ubuntu:18.04
$ docker images
REPOSITORY     TAG        IMAGE ID          CREATED         SIZE
ubuntu         18.04      3556258649b2      9 days ago      64.2MB
- Running image to create a container (-it stands for interactive mode):
$ docker run -it ubuntu:18.04
root@4183618bcf17:/# ls
bin boot dev etc home lib lib64 media mnt opt proc root run sbin srv sys tmp usr var
root@4183618bcf17:/# exit
exit
- Listing Containers
$ docker ps -a
CONTAINER ID   IMAGE          COMMAND       CREATED         STATUS
4183618bcf17   ubuntu:18.04   “/bin/bash”   4 minutes ago   Exited
That's it for this article. Check out the Docker Cheatsheet: Click Here
Youtube Stream on Getting Started with Docker: Click Here
Now that you understand the basics, keep experimenting and see how you can use Docker to package and distribute your applications.